//
Subscribe to the Tabnine newsletter
//
Get news and updates about AI, software development, and more.

Unit testing in Java is the practice of testing individual units of source code to determine whether they are fit for use. A unit is the smallest testable part of any software, typically a method in an object or class. The goal is to isolate each unit of the system to identify, analyze and fix the defects.
Unit tests are written and run by software developers to ensure that code meets its design and behaves as intended. These tests are written using frameworks that provide assertions to validate software correctness. In Java, several such frameworks exist, which we will cover in more detail below, including JUnit, Mockito, and AsserJ.
Unit testing is a critical part of the development process, which allows you to catch bugs early and fix them before they reach production. It fosters a cleaner codebase, enhances code reusability and improves the design of your software. With unit tests, you can also refactor code confidently, knowing that if anything breaks, the tests will alert you.
Learn more in our detailed guide to Unit Testing with Python.
There are numerous unit testing frameworks and tools available for Java. Here are the most popular ones:
JUnit is the most common unit-testing framework in Java. It is an open-source tool designed for writing and running repeatable tests. It is an instance of the xUnit architecture for unit testing frameworks.
JUnit provides annotations to identify test methods and contains assertions for testing expected results. It provides test runners for running tests and test suites, as well as test case classes for organizing and managing tests.
TestNG is another testing framework inspired by JUnit and NUnit. It is designed to cover all categories of tests, including unit, functional, end-to-end, integration, etc. It provides more flexible configuration and execution options than JUnit.
TestNG introduces some new functionalities that make it more powerful and easier to use, such as support for data-driven testing, parallel test execution, and test configuration flexibility. TestNG also provides strong integration with build tools like Maven and Gradle.
Mockito is a mocking framework for Java. It is used in conjunction with testing frameworks like JUnit or TestNG. Mockito allows you to create and configure mock objects, which simulate other parts of your environment to ensure unit tests run without external dependencies. Using Mockito, you can verify that methods were called with certain parameters, and you can check the interaction between the objects in your code.
Mockito simplifies the process of creating mock objects by removing the need for explicit configuration or specification of mock behavior. It uses a very simple API for this purpose, making the tests easy to write and read.
AssertJ is a library providing rich assertions for writing unit tests in Java. It provides a fluent assertion syntax, which allows for powerful and easy-to-read assertions.
AssertJ can be used with either JUnit or TestNG, and it provides assertions for a wide range of types. It supports everything from collections and maps to dates and numbers. One of the key features of AssertJ is its ability to chain assertions, which lets you create readable and maintainable tests. It is also extensible, allowing you to write custom assertions that suit your needs.
Related content: Learn more in our detailed guide to Unit Testing in C#.
Here are the general steps involved in creating a Java unit test with JUnit.
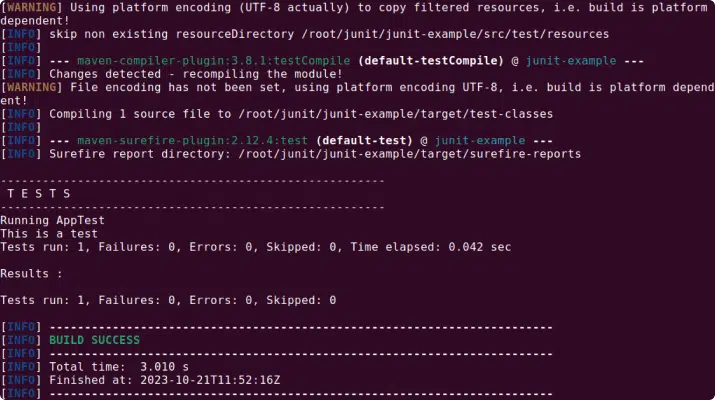
Creating a test class and methods is the first step in writing your JUnit test. In Java, we typically name the test class similar to the class we’re testing, but with a Testsuffix. For example, if we’re testing a class named Calculator, our test class will be CalculatorTest.
Inside the test class, we then create test methods. Each test method represents a separate test case we want to check. For example, if we want to test the addition method of the Calculator class, we might have a method named testAddition. It’s important to note that test methods in JUnit should be public, return void, and take no parameters.
To create a test class and methods, we use the @Testannotation before each method. This tells JUnit that the annotated method is a test method.
import org.junit.Test;

public class CalculatorTest {

    @Test
    public void testAddition() {
        // Your test code here
    System.out.println(“This is a test”);
    }
}
Using Maven on Ubuntu 20.04, the output looks like this:
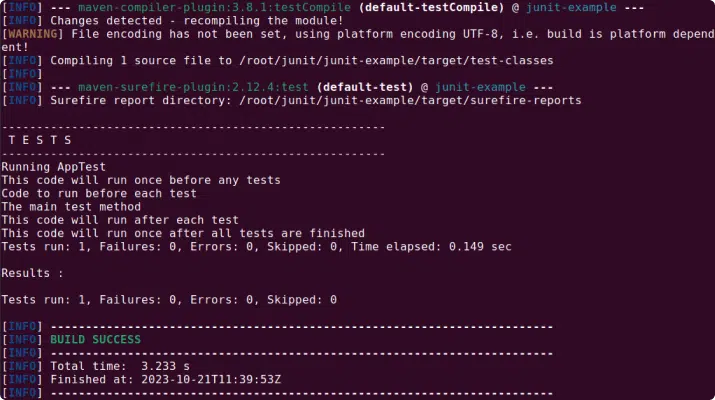
In JUnit, annotations are used to provide metadata about your tests. They can control the test flow and give information about the testing methods and classes. Here are some of the key annotations you will encounter:
@Test: Marks the method as a test method.@Before: Used to specify that a method will be invoked before each test. This is useful for setting up common test data.@After: Specifies a method that will be invoked after each test. This is often used to clean up test data.@BeforeClass: Identifies a method that will be run once before any test methods in the class. This could be used to set up more complex data structures.@AfterClass: Specifies a method that will be run once after all tests in the class have been run. This could be used for clean-up activities.import org.junit.*;
public class CalculatorTest {
@BeforeClass
public static void setUpClass() {
// Code to run once before any tests
System.out.println(“This code will run once before any tests”);
}
@Before
public void setUp() {
// Code to run before each test
System.out.println(“Code to run before each test”);
}
@Test
public void testAddition() {
// Your test code here
System.out.println(“The main test method”);
}
@After
public void tearDown() {
// Code to run after each test
System.out.println(“This code will run after each test”);
}
@AfterClass
public static void tearDownClass() {
// Code to run once after all tests are done
System.out.println(“This code will run once after all tests are finished”);
}
}
The output looks like this:
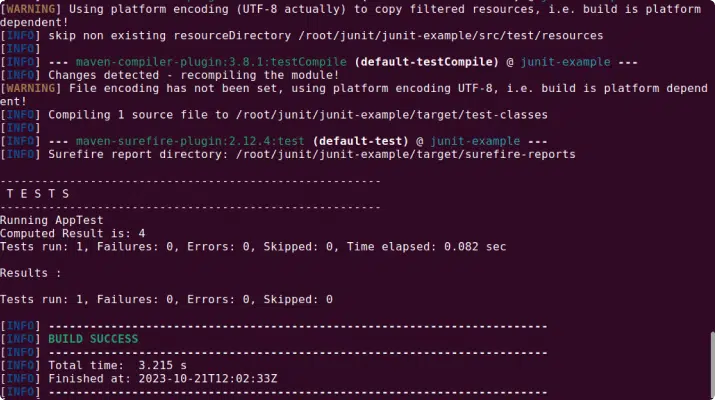
Assertions are the heart of your tests. They are what determine whether a test passes or fails. In JUnit, assertions are made using the ‘assert’ methods provided by the Assert class.
The assertEquals method, for example, checks that two values are the same. If they are not, the test fails. There’s also assertTrue and assertFalse for checking boolean conditions, and assertNotNull and assertNull for checking whether an object is null.
import org.junit.Assert;
import org.junit.Test;

public class CalculatorTest {

    @Test
    public void testAddition() {
        Calculator calculator = new Calculator();
        int result = calculator.add(2, 2);
        Assert.assertEquals(4, result);
    }
}
The output looks like this:
One of the fundamental principles of unit testing is that tests should be independent and isolated. That means that each test should stand on its own, and the result of one test should not affect the result of another test.
Keeping tests independent often means setting up and tearing down the test environment for each test. This can be done using the @Before and @After annotations that we learned about earlier. This ensures that each test starts with a fresh environment, free from any changes that might have been made by previous tests.
Good naming conventions can make your tests much easier to understand and maintain. A common convention is to name your test methods in a way that describes what they are testing.
For example, instead of naming a test method test1, you might name it testAdditionWithPositiveNumbers. This makes it immediately clear what the test is doing. It’s also helpful to follow a consistent naming pattern across your tests, to make it easier to find specific tests.
Logic in tests can make them harder to understand and more prone to errors. It’s generally best to avoid using conditions, loops, or other types of control flow in your tests.
Instead, aim to make your tests straightforward and linear. Each test should set up some data, perform an action, and then check the result. If you find yourself needing to use logic in a test, consider whether the test could be split into multiple smaller tests.
Each test method should test only one thing. This makes your tests simpler and easier to understand. It also makes it easier to identify the cause of a test failure.
For example, instead of having a single test method that tests both addition and subtraction, you would have two separate test methods: one for addition and one for subtraction. This way, if the test for addition fails, you know that the problem is specifically with the addition functionality.
Tabnine accelerates and simplifies the entire software development process with AI coding assistant that helps developers create, test, fix, document and maintain code. Tabnine can also automatically generate and assist in creating or maintaining unit tests, helping developers increase test coverage, and catch issues earlier in deployment. If tests fail or bugs emerge, Tabnine will help diagnose the issue and propose code suggestions to fix the problem.
Tabnine is the AI coding assistant that helps development teams of every size use AI to accelerate and simplify the software development process without sacrificing privacy, security, or compliance. Tabnine boosts engineering velocity, code quality, and developer happiness by automating the coding workflow through AI tools customized to your team. Tabnine supports more than one million developers across companies in every industry.
Unlike generic coding assistants, Tabnine is the AI that you control:
It’s private. You choose where and how to deploy Tabnine (SaaS, VPC, or on-premises) to maximize control over your intellectual property. Rest easy knowing that Tabnine never stores or shares your company’s code.
It’s personalized. Tabnine delivers an optimized experience for each development team. It’s context-aware and delivers precise and personalized recommendations for code generation, code explanations, guidance, and for test and documentation generation.
It’s protected. Tabnine is built with enterprise-grade security and compliance at its core. It’s trained exclusively on open source code with permissive licenses, ensuring that customers are never exposed to legal liability.
Tabnine provides accurate and personalized code completions for code snippets, whole lines, and full functions. Tabnine Chat in the IDE allows developers to communicate with a chat agent in natural language and get assistance with various coding tasks, such as:
Try Tabnine for free today or contact us to learn how we can help accelerate your software development.
Explore recent posts
//Explore recent posts
//
2 -min read

4 -min read

32 -min read
More How-to's
//3 -min read
4 -min read
5 -min read