//
Subscribe to the Tabnine newsletter
//
Get news and updates about AI, software development, and more.
Code reviews are a core tenant in the software development process to ensure that the code is free of bugs and up to the expected standard. These reviews are typically done through a source code repository before merging the code to the main branch. Bitbucket is one of the most popular git-based source code repositories, with over 10 million developers using it to manage their projects. This post will show how to utilize the BitBucket code review features to review our code.
BitBucket is a git-based managed source control repository service. It provides users with all the necessary features to handle any software development at any scale. As an Atlassian offering, Bitbucket has first-party integrations with all the other Atlassian services such as JIRA Software, Confluence, Trello, Bamboo, and Opsgenie to power the entire software delivery process.
BitBucket service offers a whole host of features to power all your code management needs, such as;
The code review functionality consists of multiple features to simplify the overall review process. The code-first approach adapted by the Bitbucket code review emphasizes readability with a single-page view for a pull request. It enables users to quickly review large codebases, find issues and fix them easily. Features like task management and contextual commenting allow users to easily manage changes to the code base. Integrating test results and security scans directly with the pull request and getting alerts for failures provides another layer of quality control for the review.
The ability to check the build state ensures that no failed build will get merged. Developers do this within the straightforward navigation provided by the one-page view of the pull request. It enables users to manage the entire request until it is merged from the single interface. When using a premium subscription, the merge conditions can be enforced upon the pull request to ensure no PR is merged until all the requirements are satisfied. These features make the BitBucket code review one of the most feature-rich yet initiative code review tools.
Now that you have a basic idea of what we can achieve with Bitbucket code review. Let’s look at how to use this feature in a development pipeline. This section will go over the main stages of the code review process using Bitbucket.
Let’s take an example scenario. Assume you are developing a website and other developers are working for you. IYou would want to review their code before merging it into production. You can do this through a simple bitbucket code management workflow described below.
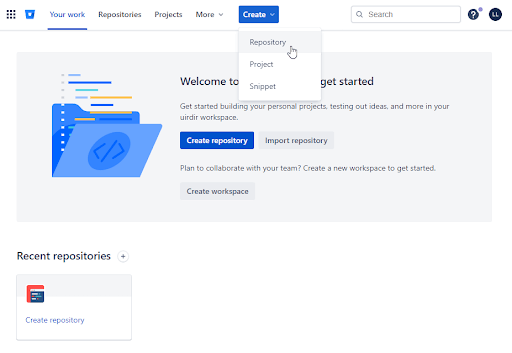
The first step of any software development project is to create a repository to host and manage the source code.
Step 1 – Login to BitBucket and select the Repository option under the Create button on the top menu.
Step 2 – Provide the necessary details in the repository creation screen.
It includes the basic information such as:
Advanced settings like:
Provide all the necessary details and click on Create Repository button.

Note – For the “Include a README” option, we have selected the “Yes, with a tutorial” option. It will create a simple README.md file with some basic instructions on using the repository.
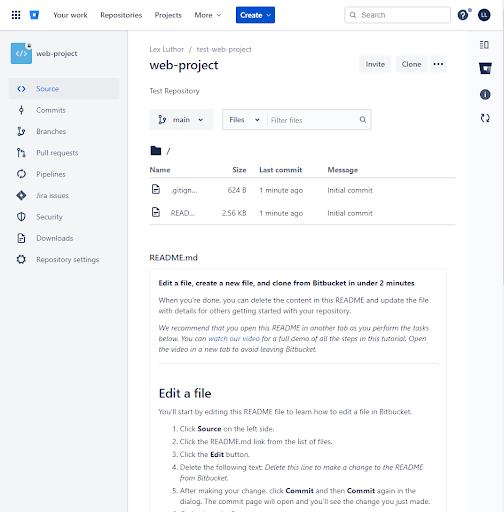
You will be automatically activated to the newly created repository. In this instance, the web-project repository will look like the following.
Step 3 – Now, we have a brand new repository. The next step is to add some files to this empty repository. We can do it either through the CLI, a GUI tool like Sourcetree, or the web interface.
Assume you have the following HTML file called index.html in your local environment.
<!DOCTYPE html>
<html>
    <head>
        <meta http-equiv="Content-Type" content="text/html; charset=utf-8">
        <style type="text/css">
        h1 {
            font-family:'Times New Roman', Times, serif;
            font-size: 50px;
            text-align: center;
            color: #0052CC;
            margin-top: 50px;
        }

        p {
            font-family:'Times New Roman', Times, serif;
            font-size: 20px;
            text-align: center;
            color: #cc0000;
            margin-top: 50px;
        }
        </style>
        <title>Bitbucket Code Review Test</title>
    </head>
    <body>
        <div width="100%">
            <h1>Test Web Page</h1>
            <hr width="100%" size="5" color="#0052CC">
        </div>
        <div width="50%">
            <p>
                Hello, This is a Simple Web Page
            <p>
                <img src="https://images.unsplash.com/photo-1568144628871-ccbb00fc297c?ixlib=rb-1.2.1&ixid=MnwxMjA3fDB8MHxwaG90by1wYWdlfHx8fGVufDB8fHx8&auto=format&fit=crop&w=1170&q=80" width="100%"/>
        </div>
    </body>
</html>
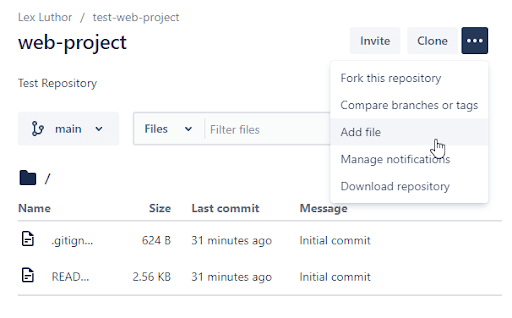
We can add this code to the repository using the “Add file” option. Click on the Add file option of the repository menu.
It will open the source view, where you can provide a filename and the content. Name the file as index.html, copy and paste the content, and click commit. Provide a commit message if required, and it will create the file in the repository under the selected branch.
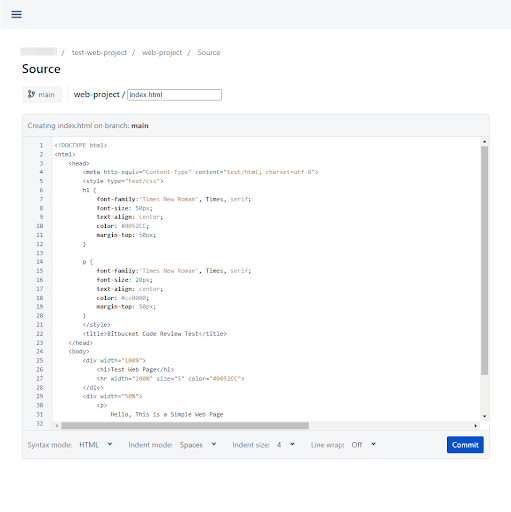
You will see the committed file once the file is created.
Now we have a repo. Let’s see how to use this repo in a local development environment.
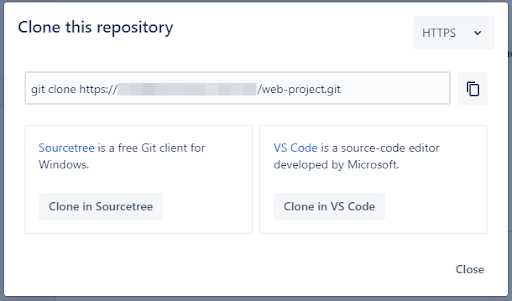
Step 1 – Clone the repository. Click the clone button in the repository to obtain the repository URL.
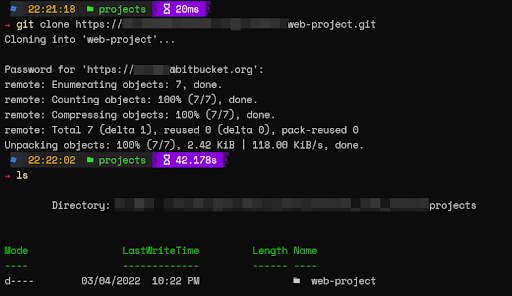
Step 2 – Use the cloning URL and clone the repository to your local environment. The following example is based on a Windows environment with Windows Terminal in Powershell.
Step 3 – Navigate to the cloned project directory and create a new branch using the git checkout function.

Step 4 – Open the cloned project in your favorite IDE and change the index.html file. For example, let’s move the CSS from the head section to a separate file called main.css.
main.css
h1 {
    font-family:'Times New Roman', Times, serif;
    font-size: 50px;
    text-align: center;
    color: #0052CC;
    margin-top: 50px;
}

p {
    font-family:'Times New Roman', Times, serif;
    font-size: 20px;
    text-align: center;
    color: #cc0000;
    margin-top: 50px;
}
index.html
<!DOCTYPE html>
<html>
    <head>
        <meta http-equiv="Content-Type" content="text/html; charset=utf-8">
        <link rel="stylesheet" href="main.css">
        <title>Bitbucket Code Review Test</title>
    </head>
    <body>
        <div width="100%">
            <h1>Test Web Page</h1>
            <hr width="100%" size="5" color="#0052CC">
        </div>
        <div width="50%">
            <p>
                Hello, This is a Simple Web Page
            <p>
                <img src="https://images.unsplash.com/photo-1568144628871-ccbb00fc297c?ixlib=rb-1.2.1&ixid=MnwxMjA3fDB8MHxwaG90by1wYWdlfHx8fGVufDB8fHx8&auto=format&fit=crop&w=1170&q=80" width="100%"/>
        </div>
    </body>
</html>
Step 4 – Finally, commit the changes and push the new branch to Bitbucket using git add, commit and push commands.
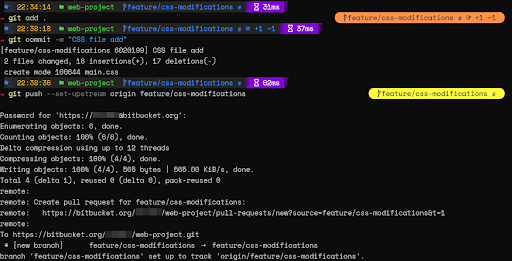
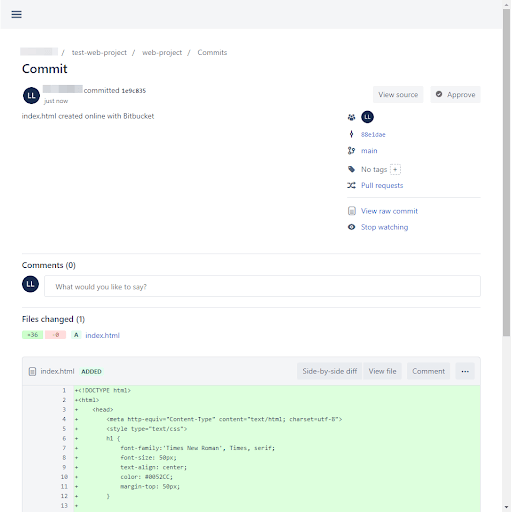
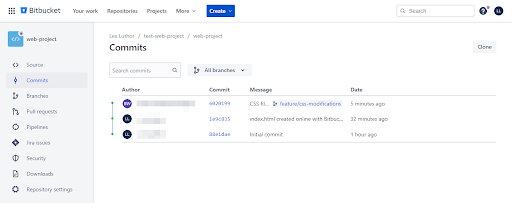
Step 5 – If you look at the commits section on Bitbucket, you will see a new commit with the new branch.
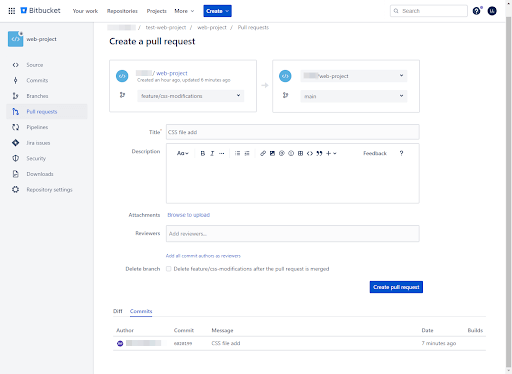
Now we have a new branch with changes. The next step is to create the pull request and do the code review.
Step 1 – Navigate to the pull requests section in the repository and click on the create pull request button.

Step 2 – Enter the necessary details for the PR and create the pull request. It will include which branch to be merged, a short description of the changes, users who need to review the code, and the option to delete the branch once it is incorporated.
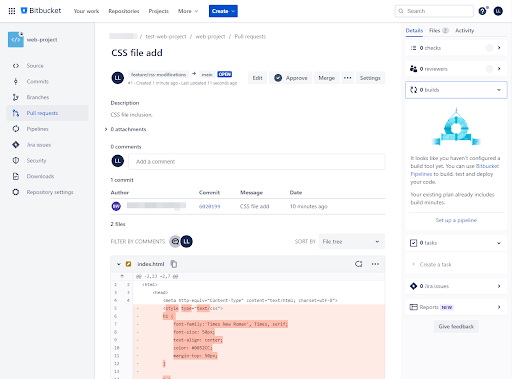
Step 3 – Once it creates the PR, the user can view the request and do the code review. The requested page contains all the request details, including the code changes. It will also include automated tasks such as build status, test, and security scan details.
Step 4 – If the code review is satisfactory, the next step is to merge the PR. First, we need to approve the request by clicking the Approve button. As shown below, it will change the PR state to “approve.”

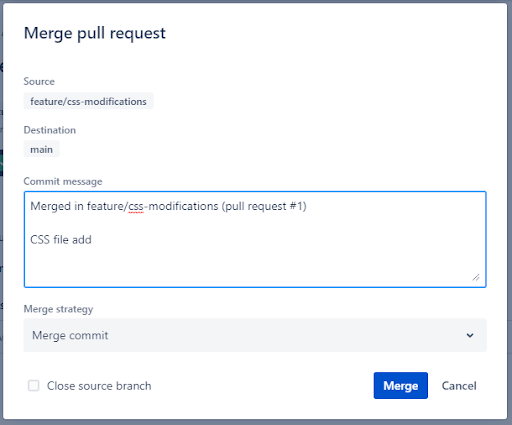
Step 5 – Integrate the PR by simply clicking on the Merge button. It will prompt the merge screen. Here, provide the merge commit and the merge strategy and click on merge to connect the source branch with the main branch.
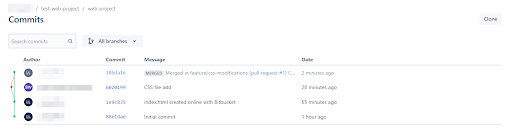
Step 6 – Verify the Merge by visiting the commits section on the Bitbucket repository. Here, you will see that the new branch connects with the master.
Code reviews are an essential part of any software development method. They provide a way to control code quality and allow developers to obtain peer feedback to improve their skill set. Any software project aims to create a product that fulfills the end-user requirements. AI-assisted auto-completion tools like Tabnine can enhance the productivity of your team. They will empower them to write code faster and more accurately, improving the overall quality of the software product.
Explore recent posts
//Explore recent posts
//
5 -min read

5 -min read

< 1 -min read
More How-to's
//3 -min read
3 -min read
3 -min read